Showing posts with label bathroom. Show all posts
Showing posts with label bathroom. Show all posts
Wednesday, December 2, 2009


Thursday, November 19, 2009
The Throne.
As promised, the throne. The vanity will have several drawers and storage. I'm very excited about all of the storage the Motor Castle will have. Much more then your out of the factory models!

Thursday, November 12, 2009
Progress Report II: The Bathroom Edition
Where does the King go alone?
The throne.
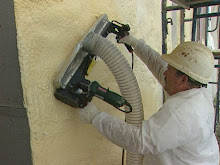
This progress report will focus on the bathroom. I built all of the cabinetry housing the shower, toilet and sink. Additionally, I chose to create my own custom shower stall using the spray foam technique I apply to line the fish holds of commercial fishing boats.
This system uses a 3-pound urethane spray-in-place foam that has a closed cell structure and is Zero-Ozone-Depleting. The sprayed foam expands as it cures, filling any gaps and fully self-adhering, forming a monolithic insulating barrier that is strong, lightweight, and durable. Next, the patented Masterbond-SP™ planing process yields a smooth superior surface for direct sealant application, producing a bond that is strong, non-bacteria supporting and capable of withstanding extreme abuse & temperature changes. Finally, SPI white/color-stable [to resist yellowing], food approved polyurea plastic is applied to minimum 100 mil thickness.
 This is the shower stall before I applied the spray foam shell and polyurea plastic liner.
 This is the same shot with the spray foam system in place. Here you can see a portion of the seat I formed with the foam.
 Here I am enjoying a rest on the seat in the shower! I formed this seat by hand out of foam!
 Spray foam is a very versatile substance. In the shower, I carved out a slot for soap, complete with a drainage notch, and built up a shelf for shampoo and such.
 This is a close up of the carved out soap slot.
 This is a close up of the shampoo shelf.
 I installed a glass door to complete the shower stall.
 This is the sink area.
Stay tuned for a future edition of the Progress Report where I'll show you the throne and the cabinetry in the bathroom.
The throne.
This progress report will focus on the bathroom. I built all of the cabinetry housing the shower, toilet and sink. Additionally, I chose to create my own custom shower stall using the spray foam technique I apply to line the fish holds of commercial fishing boats.
This system uses a 3-pound urethane spray-in-place foam that has a closed cell structure and is Zero-Ozone-Depleting. The sprayed foam expands as it cures, filling any gaps and fully self-adhering, forming a monolithic insulating barrier that is strong, lightweight, and durable. Next, the patented Masterbond-SP™ planing process yields a smooth superior surface for direct sealant application, producing a bond that is strong, non-bacteria supporting and capable of withstanding extreme abuse & temperature changes. Finally, SPI white/color-stable [to resist yellowing], food approved polyurea plastic is applied to minimum 100 mil thickness.
 This is the shower stall before I applied the spray foam shell and polyurea plastic liner.
 This is the same shot with the spray foam system in place. Here you can see a portion of the seat I formed with the foam.
 Here I am enjoying a rest on the seat in the shower! I formed this seat by hand out of foam!
 Spray foam is a very versatile substance. In the shower, I carved out a slot for soap, complete with a drainage notch, and built up a shelf for shampoo and such.
 This is a close up of the carved out soap slot.
 This is a close up of the shampoo shelf.
 I installed a glass door to complete the shower stall.
 This is the sink area.
Stay tuned for a future edition of the Progress Report where I'll show you the throne and the cabinetry in the bathroom.
Progress Report I: Spray Foam Insulation & Custom Cabinetry
So far I have gutted the motor home, sprayed the inside with closed cell spray foam insulation and have begun building custom cabinetry.
Here are some photos showing my progress.
 This is the exterior. I have opted to eliminate the rear door and window to allow for a larger shower and rear bedroom.
 This is the opposite side. Here I have opted to remove one of the windows towards the front to allow for a better living room layout and room for more custom cabinetry.
 Here I am standing with my back to the dashboard, looking down the center passage of the motor castle. To the left is my custom kitchen. The cabinet is curved for ease of movement. It also has a cutting board that slides out. There will be a sink, a stove top and a microwave. To the right is the eating nook. Down the center to the left is the space for the shower, to the right the toilet and to the back a large master bedroom.
 This is a picture of the eating area with built in benches.
(1) Closed Cell vs. Open Cell Foam , available at: http://www.sprayfoam.com/spps/ahpg.cfm?spgid=6 on November 12, 2009.
"The advantages of closed-cell foam compared to open-cell foam include its strength, higher R-value, and its greater resistance to the leakage of air or water vapor." (1)
"Closed-cell foam would be a good choice where small framing sizes need the greatest R-value per inch possible." (1)For more information and to compare closed cell vs. open cell spray foam, please refer to this article on SprayFoam.com
Here are some photos showing my progress.
 This is the exterior. I have opted to eliminate the rear door and window to allow for a larger shower and rear bedroom.
 This is the opposite side. Here I have opted to remove one of the windows towards the front to allow for a better living room layout and room for more custom cabinetry.
  Here I am standing with my back to the dashboard, looking down the center passage of the motor castle. To the left is my custom kitchen. The cabinet is curved for ease of movement. It also has a cutting board that slides out. There will be a sink, a stove top and a microwave. To the right is the eating nook. Down the center to the left is the space for the shower, to the right the toilet and to the back a large master bedroom.
  This is a picture of the eating area with built in benches.
(1) Closed Cell vs. Open Cell Foam , available at: http://www.sprayfoam.com/spps/ahpg.cfm?spgid=6 on November 12, 2009.
Subscribe to:
Posts (Atom)