Showing posts with label motorhome. Show all posts

Thursday, January 28, 2010

Today I Pulled Back the Curtain

We wanted to see how it's looking in daylight and get some full length pictures of the basecoat stage of the motorhome. My guys helped me finish the basecoat. Now I'm trying to decide on stucco color combinations.

Please send your color suggestions either by leaving a comment here or e-mail me

I'm thinking a medium blue on the bottom, dark blue gray in the stripes and light blue on the top half. What do you think?


I debated how to finish the edges around the windows and decided to go with a bull nose edge.

Wednesday, January 20, 2010

Dado Detailing

To add an interesting aesthetic to the sides of my motorhome, and to demonstrate the versatility of flattened spray foam, I have added dado detailing along the sides. Here are a few pictures of the dados. (For those that don't know, a dado is a groove. It's a term used largely in carpentry).

This is a very slow, careful process, it requires striking a straight, level line, then taking a handsaw and cutting along the line to the desired depth. Then I take the saw and cut out the initial bigger chunks and carefully carve out the remainder with my striker tool - this one is 1.5' by 1" with short angled blades all along it; actually a key tool in my patented wall system.


Friday, January 15, 2010

Planing of the Spray Foam Complete!

Check!

Next.

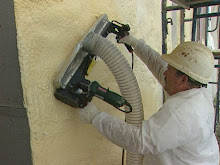
It's taken me about a day to use my Masterbond-SP Vac-Plane tool to plane the exterior spray foam on my motorhome, completely flat. I've fine tuned the wall with the round brush as well. Here are some pictures of the flattened exterior walls.


Next step, acrylic base coat, then stucco finish!

Tuesday, January 12, 2010

Finally, Spray Foam Complete!

After simply heating, for about an hour, the exterior of the metal motorhome to the proper temperature for successful spray foam adhesion, I have completed the first phase of my patented Masterbond-SP exterior wall system: application of closed cell spray foam insulation. Here are a few images of the dried foam.


That's me at the end.

Under the Big Tent


All proper castles have tents in their courtyard hiding the wonders of the world within. The bearded lady...the snake man...the world's first stucco motor castle!

I had to do a little rearranging of vehicles etc. to accommodate the final phases of my stucco motorhome. Taking down the neighbor's fence was not an option. So, the souped up van I had in a car show years ago, was loaded onto a flatbed and moved to my warehouse, my large foam truck I take to jobs is parked in the street and the motor castle is now centered in my driveway.

Once in place, the winter weather approach of spraying foam insulation had to be set up. When I do exterior spray foam insulation jobs in the winter I tarp over the entire space as I need to heat the air and the surface to a certain temperature so the foam adheres correctly. This is surprisingly much easier than you would expect. It took about an hour to get the metal exterior walls of the motorhome to the desired temperature.
Boy I would hate to be my neighbors. At least I'm adding a little color to an otherwise bleak winter landscape!
I've set up a couple of stories of staging so I can easily spray the top of the motorhome.

Monday, December 14, 2009

Unearthed: Early Demolition Pictures

This week I dug deep into the vaults and unearthed pictures documenting the skeletal remains of the motor castle, pre massive remodeling overhaul.

After prying off all of the old wall covering, I was surprised to see that even in the late 70's, the motorhome was insulated with....SPRAY FOAM!


The next phase was to spray the insides with foam. I covered many of the windows and removed some. (This is my son peeking through an opening in the side). Looking towards the back.

Here is the spray foam layer, looking towards the front (my son again).

The next phase was to vac-plane the foam to be flush with the metal joists and completely flat. I used my patented Masterbond SP Vac-Plane tool.

Once that was complete I was able to attach the wood paneling I am using for my wall surface.


Thursday, November 19, 2009

Progress Report V: TV Lounge and Master Bedroom

Everything in the stucco motor castle is versatile. Furniture doubles as storage, rooms double in their functionality and furniture doubles as other types of furniture and can be reconfigured in various ways.

The TV Lounge and Master Bedroom are a perfect example. I've designed this room so that depending on the number of people on board, the beds can be configured in different ways. When it is just me out on a business trip promoting my Masterbond Wall System and training applicators on how to install this system, I will have the full size memory foam mattress up like a sofa on the left hand side of the room. I'm installing a TV over the twin size bed on the right side of the room.

However, if the Queen joins me on a journey, I can slide out the bed extender board, swap the location of the two mattresses and easily have a king size bed! Also, under the twin size bed is another storage cabinet; half is accessed from inside the motor castle and half is accessed from an outside door for dirty tools and spare parts. Under the sofa side of the room are going to be two large cabinets.

The sofa side of the room.

The twin bed side of the room.

The bed extension board pulled out.

As viewed from the rest of the castle.

Gleaming Counter Top

No castle is complete without counter tops so shiny you could shave in them.

My solution to keep the cost and weight down was to cut square granite tiles to measure to cover the counter.

Plywood base.

Cement board layer so the tiles adhere better.

The castle's granite counter!

How it will look assembled with the stove top and sink in place.

While we are on the subject of the kitchen, I've just installed the collabsible table. Here is a peek at that:

Wednesday, November 18, 2009

Doors Galore!

My warehouse was turned into a cabinet making factory this weekend! Here are some shots of the work my brother helped me with.

Decorative routered inner edge.

Rounded corners, so you don't bump your noggin. I have a history of bumping my head so this is an important concern of mine.

Cabinet sanded and primed.

Monday, November 16, 2009

Progress Report IV: The Living Room


I've opted to keep the original captains chairs in the cab. I am also leaving much of the dash area as is as both are in great shape for their years.

Here you can see the curved wooden area above the cab that blends into the custom cabinets along the entire perimiter of the motor castle.

The sofa is a full size bed. I am using a luxurious memory foam mattress. I've designed a curved pull out that doubles as the bed support and extra storage.

Here is a closer look at the curved pull out.

It's on heavy duty wheels and tracks.

Progress Report III: The Kitchen

I've put my productivity into high gear as I would like to have the motor castle finished and on the road by my birthday, December 5! Last week I stained all of the cabinet boxes. This weekend my brother, Dave, more popularly known as "Hodoka Dave", helped me install a granite counter and build cabinet doors. Hodaka is a multi-talented carpenter/plumber/electrician/know-it-all/kind of guy and I love him to pieces and appreciated every minute with him this weekend. This week we are finishing the cabinet doors.

Meanwhile, here are some progress pictures of my kitchen.
Slide out pantry shelf with rails and varying shelf heights to hold different sized items.

Close up of pantry. This tucks conveniently into the wall for storage.


Curved cabinet above the counter. I curved it so you don't bump your head upon entering the door.

The tile I am going to line the wall with and the stove hood.

Curved counter and slide out cutting board.

I primed all of the wood walls and here is a closer taste of what the eating nook will look like. The benches are hollow and the cushion will be removable so you can use this as a storage space.