Thursday, January 28, 2010

Today I Pulled Back the Curtain

We wanted to see how it's looking in daylight and get some full length pictures of the basecoat stage of the motorhome. My guys helped me finish the basecoat. Now I'm trying to decide on stucco color combinations.

Please send your color suggestions either by leaving a comment here or e-mail me

I'm thinking a medium blue on the bottom, dark blue gray in the stripes and light blue on the top half. What do you think?


I debated how to finish the edges around the windows and decided to go with a bull nose edge.

Friday, January 22, 2010

The Finish Line is Near!


One of my guys and I spent the morning doing the base coat on the exterior of the motor castle. We apply it directly to the planed flat spray foam using a structural grid material. Base coat is great to perfect the final appearance, fill low spots and mold flaws.
I'm spreading the base coat on with a small trowel.
Here I am trimming the grid work to cover the surface.
Sometimes I need to build custom tools to get the job done. This tool is to perfect the base coat application in the dados.
Here is a close up of the detail work around the wheel well.

Wednesday, January 20, 2010

Dado Detailing

To add an interesting aesthetic to the sides of my motorhome, and to demonstrate the versatility of flattened spray foam, I have added dado detailing along the sides. Here are a few pictures of the dados. (For those that don't know, a dado is a groove. It's a term used largely in carpentry).

This is a very slow, careful process, it requires striking a straight, level line, then taking a handsaw and cutting along the line to the desired depth. Then I take the saw and cut out the initial bigger chunks and carefully carve out the remainder with my striker tool - this one is 1.5' by 1" with short angled blades all along it; actually a key tool in my patented wall system.


Friday, January 15, 2010

Planing of the Spray Foam Complete!

Check!

Next.

It's taken me about a day to use my Masterbond-SP Vac-Plane tool to plane the exterior spray foam on my motorhome, completely flat. I've fine tuned the wall with the round brush as well. Here are some pictures of the flattened exterior walls.


Next step, acrylic base coat, then stucco finish!

Wednesday, January 13, 2010

Masterbond-SP Vac-Plane Tool Demonstration


This video can also be viewed on youtube.com

My office assistant and I have put together a video elaborating on the Vac-Plane tool, it's use and the general planing process.

Tuesday, January 12, 2010

Planing the Spray Foam

The next step in my patented Masterbond-SP wall system, is to use a tool I invented, the Vac-Planer. We use these on all of our exterior jobs as it is a crucial piece to my patented wall system process. I use my patented Vac-Planer tool to plane the dried spray foam insulation to a perfectly flat surface. It has an optional vacuum attachment that is great to keep job sites clean. It's optional as some jobs, such as this one, occupy such small spaces that the vacuum hose is not useful. Shaved foam chips are easy to sweep or vacuum up afterwards if you don't use the vacuum attachment.

The first thing I like to do is to dig out any fixtures. Here I've dug out the heater components. 
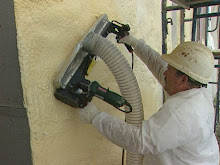
Here I am in action, planing the wall.
(NOTE: You may want to mute your computer or turn down volume before playing this video clip as it is live and full volume!)

This is a profile picture of the sprayed foam before I planed it. This is a profile picture of the same wall after I planed it. I've placed a straightedge on it to check for low and high spots.
Once I assess the high and low spots, I then fine tune the wall and sculpt desired portions with a round brush (actually designed for grooming horses!).

This is a sculpted flare above the wheel well.

Finally, Spray Foam Complete!

After simply heating, for about an hour, the exterior of the metal motorhome to the proper temperature for successful spray foam adhesion, I have completed the first phase of my patented Masterbond-SP exterior wall system: application of closed cell spray foam insulation. Here are a few images of the dried foam.


That's me at the end.

Under the Big Tent


All proper castles have tents in their courtyard hiding the wonders of the world within. The bearded lady...the snake man...the world's first stucco motor castle!

I had to do a little rearranging of vehicles etc. to accommodate the final phases of my stucco motorhome. Taking down the neighbor's fence was not an option. So, the souped up van I had in a car show years ago, was loaded onto a flatbed and moved to my warehouse, my large foam truck I take to jobs is parked in the street and the motor castle is now centered in my driveway.

Once in place, the winter weather approach of spraying foam insulation had to be set up. When I do exterior spray foam insulation jobs in the winter I tarp over the entire space as I need to heat the air and the surface to a certain temperature so the foam adheres correctly. This is surprisingly much easier than you would expect. It took about an hour to get the metal exterior walls of the motorhome to the desired temperature.
Boy I would hate to be my neighbors. At least I'm adding a little color to an otherwise bleak winter landscape!
I've set up a couple of stories of staging so I can easily spray the top of the motorhome.