Showing posts with label motor home. Show all posts

Thursday, February 11, 2010

Inventor unbowed by truck theft

"Belleau's box truck was stolen on Saturday by a man police said was drunk. The thief smashed into six parked cars and damaged Belleau's equipment that was inside the truck.
Mark Lorenz / Staff Photographer"


I'm in the news! This time about my invention, and less about the truck theft. They even got some great pictures of the full length of the motorhome.

"Inventor unbowed by truck theft

By Bruno Matarazzo Jr.
Staff Writer


SALEM — When a drunken New Hampshire man allegedly stole Michael Belleau's box truck and crashed into six parked cars and a tree Saturday night, his vehicle wasn't the only thing damaged.

Belleau, an inventor and self-proclaimed "maverick" in the spray foam industry, had his livelihood damaged, as well. Damaged, but not broken.

His equipment, valued at more than $25,000, was damaged in the crashes on Hazel Street, just down the street from Belleau's home.

"It couldn't have come at a worse time," Belleau said. "I'm trying to demonstrate to the foam industry how sharp and durable my system is so I can get the big guys to step up."

Belleau said he was home when police said Joshua Boulay, 24, of Tamworth, N.H., stole the truck while drunk. Police said he also threatened another man while rummaging through his truck.

Boulay was arrested and faces 18 charges, including drunken driving and receiving a stolen vehicle.

A judge denied Boulay bail at his arraignment on Monday, and he'll be in Salem District Court tomorrow for a dangerousness hearing.

Belleau said he didn't hear his truck start up on Saturday and that he's not one to lock his vehicle's doors.

Belleau is not letting the theft of his truck and his equipment's destruction stop him from his dream.

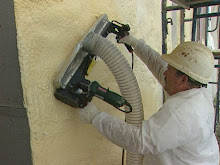
He still plans to drive his mobile home, which he dubs "The Mobile Castle," down to Orlando, Fla., this weekend for the 2010 Spray Foam Conference. The outside of his mobile home is sprayed with the foam using his patented "planers" that give the walls the stucco finish.

Belleau is nominated for an award at the conference.

"I don't want to sound cocky," he said, "but I'm going to win the award because no one else can do what I do."

He's been in the business for 32 years and got his start when he was 22 years old in Newfoundland, spraying foam to insulate fish holds on fishing boats.

While there, he developed handheld spray foam to be used in the building industry, as well. He later invented a handheld "planer" that allows him to spray the foam on walls. He got a patent for his invention and is now looking to license it through his company, Masterbond-SP.

While his foam-making equipment was damaged, his rotary planers were in his "mobile castle," which went untouched.

Belleau is waiting to hear from his insurance company about the loss. Regardless, he's trying to be optimistic.

"It's all about moving forward and being positive (about) anything that happens," he said. "


"This mobile home owned by Mike Belleau is coated with spray foam, applied to the outside like stucco on a house. Belleau holds the patent to use spray foam in this manner.
Mark Lorenz / Staff Photographer"

Copyright Salem News. Article published 2/11/10 and can be read online at: http://www.salemnews.com/archivesearch/local_story_042001106.html

Thursday, January 28, 2010

Today I Pulled Back the Curtain

We wanted to see how it's looking in daylight and get some full length pictures of the basecoat stage of the motorhome. My guys helped me finish the basecoat. Now I'm trying to decide on stucco color combinations.

Please send your color suggestions either by leaving a comment here or e-mail me

I'm thinking a medium blue on the bottom, dark blue gray in the stripes and light blue on the top half. What do you think?


I debated how to finish the edges around the windows and decided to go with a bull nose edge.

Wednesday, January 20, 2010

Dado Detailing

To add an interesting aesthetic to the sides of my motorhome, and to demonstrate the versatility of flattened spray foam, I have added dado detailing along the sides. Here are a few pictures of the dados. (For those that don't know, a dado is a groove. It's a term used largely in carpentry).

This is a very slow, careful process, it requires striking a straight, level line, then taking a handsaw and cutting along the line to the desired depth. Then I take the saw and cut out the initial bigger chunks and carefully carve out the remainder with my striker tool - this one is 1.5' by 1" with short angled blades all along it; actually a key tool in my patented wall system.


Tuesday, January 12, 2010

Finally, Spray Foam Complete!

After simply heating, for about an hour, the exterior of the metal motorhome to the proper temperature for successful spray foam adhesion, I have completed the first phase of my patented Masterbond-SP exterior wall system: application of closed cell spray foam insulation. Here are a few images of the dried foam.


That's me at the end.

Monday, December 14, 2009

Unearthed: Early Demolition Pictures

This week I dug deep into the vaults and unearthed pictures documenting the skeletal remains of the motor castle, pre massive remodeling overhaul.

After prying off all of the old wall covering, I was surprised to see that even in the late 70's, the motorhome was insulated with....SPRAY FOAM!


The next phase was to spray the insides with foam. I covered many of the windows and removed some. (This is my son peeking through an opening in the side). Looking towards the back.

Here is the spray foam layer, looking towards the front (my son again).

The next phase was to vac-plane the foam to be flush with the metal joists and completely flat. I used my patented Masterbond SP Vac-Plane tool.

Once that was complete I was able to attach the wood paneling I am using for my wall surface.


Wednesday, December 2, 2009

Prepping the Exterior for Spray Foam

Now that the inside is nearly finished (final paint job, laminate flooring and carpeted ceilings is all that remains for the most part), it is time to prepare the exterior of the motor home for the application of exterior spray foam and stucco.

I'm going to use my patented Masterbond SP wall system. This system of exterior spray foam is extremely energy efficient. Basically, you are wrapping the building in foam creating a seamless barrier to moisture and the elements. Masterbond SP is super adhesive and can be applied to almost any dry sound surface - wood, metal, cement, brick etc. For more detailed information on the Masterbond SP wall system and my patents, visit my website www.sprayfoamstucco.com

Here is a video detailing the Masterbond SP Exterior Spray Foam and Stucco Wall System Process:

(Also available on YouTube.com )

I've begun the preparations on the exterior of my motor home. This includes scuffing the surface to make it rougher and easier to adhere the spray foam to. This is the same principal used when applying paint or varnish to wood; it simply makes it stick better.
I've also removed and blocked off a door and window as you can see. All remaining windows and doors will be treated with dams to hold the foam back. This is going to be a very energy efficient, warm or cool motor castle!

Thursday, November 19, 2009

Progress Report V: TV Lounge and Master Bedroom

Everything in the stucco motor castle is versatile. Furniture doubles as storage, rooms double in their functionality and furniture doubles as other types of furniture and can be reconfigured in various ways.

The TV Lounge and Master Bedroom are a perfect example. I've designed this room so that depending on the number of people on board, the beds can be configured in different ways. When it is just me out on a business trip promoting my Masterbond Wall System and training applicators on how to install this system, I will have the full size memory foam mattress up like a sofa on the left hand side of the room. I'm installing a TV over the twin size bed on the right side of the room.

However, if the Queen joins me on a journey, I can slide out the bed extender board, swap the location of the two mattresses and easily have a king size bed! Also, under the twin size bed is another storage cabinet; half is accessed from inside the motor castle and half is accessed from an outside door for dirty tools and spare parts. Under the sofa side of the room are going to be two large cabinets.

The sofa side of the room.

The twin bed side of the room.

The bed extension board pulled out.

As viewed from the rest of the castle.

Gleaming Counter Top

No castle is complete without counter tops so shiny you could shave in them.

My solution to keep the cost and weight down was to cut square granite tiles to measure to cover the counter.

Plywood base.

Cement board layer so the tiles adhere better.

The castle's granite counter!

How it will look assembled with the stove top and sink in place.

While we are on the subject of the kitchen, I've just installed the collabsible table. Here is a peek at that:

Wednesday, November 18, 2009

Doors Galore!

My warehouse was turned into a cabinet making factory this weekend! Here are some shots of the work my brother helped me with.

Decorative routered inner edge.

Rounded corners, so you don't bump your noggin. I have a history of bumping my head so this is an important concern of mine.

Cabinet sanded and primed.

Monday, November 16, 2009

Progress Report IV: The Living Room


I've opted to keep the original captains chairs in the cab. I am also leaving much of the dash area as is as both are in great shape for their years.

Here you can see the curved wooden area above the cab that blends into the custom cabinets along the entire perimiter of the motor castle.

The sofa is a full size bed. I am using a luxurious memory foam mattress. I've designed a curved pull out that doubles as the bed support and extra storage.

Here is a closer look at the curved pull out.

It's on heavy duty wheels and tracks.

Progress Report III: The Kitchen

I've put my productivity into high gear as I would like to have the motor castle finished and on the road by my birthday, December 5! Last week I stained all of the cabinet boxes. This weekend my brother, Dave, more popularly known as "Hodoka Dave", helped me install a granite counter and build cabinet doors. Hodaka is a multi-talented carpenter/plumber/electrician/know-it-all/kind of guy and I love him to pieces and appreciated every minute with him this weekend. This week we are finishing the cabinet doors.

Meanwhile, here are some progress pictures of my kitchen.
Slide out pantry shelf with rails and varying shelf heights to hold different sized items.

Close up of pantry. This tucks conveniently into the wall for storage.


Curved cabinet above the counter. I curved it so you don't bump your head upon entering the door.

The tile I am going to line the wall with and the stove hood.

Curved counter and slide out cutting board.

I primed all of the wood walls and here is a closer taste of what the eating nook will look like. The benches are hollow and the cushion will be removable so you can use this as a storage space.

Thursday, November 12, 2009

Progress Report I: Spray Foam Insulation & Custom Cabinetry

So far I have gutted the motor home, sprayed the inside with closed cell spray foam insulation and have begun building custom cabinetry.
"The advantages of closed-cell foam compared to open-cell foam include its strength, higher R-value, and its greater resistance to the leakage of air or water vapor." (1)
"Closed-cell foam would be a good choice where small framing sizes need the greatest R-value per inch possible." (1)
For more information and to compare closed cell vs. open cell spray foam, please refer to this article on SprayFoam.com

Here are some photos showing my progress.
This is the exterior. I have opted to eliminate the rear door and window to allow for a larger shower and rear bedroom.

This is the opposite side. Here I have opted to remove one of the windows towards the front to allow for a better living room layout and room for more custom cabinetry.

Here I am standing with my back to the dashboard, looking down the center passage of the motor castle. To the left is my custom kitchen. The cabinet is curved for ease of movement. It also has a cutting board that slides out. There will be a sink, a stove top and a microwave. To the right is the eating nook. Down the center to the left is the space for the shower, to the right the toilet and to the back a large master bedroom.

This is a picture of the eating area with built in benches.

(1) Closed Cell vs. Open Cell Foam , available at: http://www.sprayfoam.com/spps/ahpg.cfm?spgid=6 on November 12, 2009.

Wednesday, November 11, 2009

My Crazy Idea

Everyday my mind is swimming with ideas. I wake up at 4 AM most days because the gears already start turning and I have to sit down to sift through my thoughts.

One foggy day...ok just kidding...one day, I had this brilliant idea to buy an old motorhome, gut it, spray it with foam and cover the outside in stucco using my patented Masterbond™ wall system.

I present you *drumroll* the birth of THE WORLD'S FIRST STUCCO MOTOR CASTLE! I'm going to remodel a 1979 Dodge Titan 35 Ft. motorhome and am going to cover it in Stucco! This motorhome was made by the Champion home builders.