If you are involved in spray foam insulation, stucco, LEED projects etc. please send me a direct message as I am interested in following you on Twitter!

 The sofa side of the room.
 The twin bed side of the room.
 The bed extension board pulled out.
 As viewed from the rest of the castle.
 Plywood base.
 Cement board layer so the tiles adhere better.
 The castle's granite counter!
 How it will look assembled with the stove top and sink in place.

 My warehouse was turned into a cabinet making factory this weekend! Here are some shots of the work my brother helped me with.
 Decorative routered inner edge.
 Rounded corners, so you don't bump your noggin. I have a history of bumping my head so this is an important concern of mine.
  Cabinet sanded and primed.

 Here you can see the curved wooden area above the cab that blends into the custom cabinets along the entire perimiter of the motor castle.
 The sofa is a full size bed. I am using a luxurious memory foam mattress. I've designed a curved pull out that doubles as the bed support and extra storage.
 Here is a closer look at the curved pull out.
 It's on heavy duty wheels and tracks.
 Slide out pantry shelf with rails and varying shelf heights to hold different sized items.
 Close up of pantry. This tucks conveniently into the wall for storage.
 Curved cabinet above the counter. I curved it so you don't bump your head upon entering the door.
 The tile I am going to line the wall with and the stove hood.
 Curved counter and slide out cutting board.
 I primed all of the wood walls and here is a closer taste of what the eating nook will look like. The benches are hollow and the cushion will be removable so you can use this as a storage space.
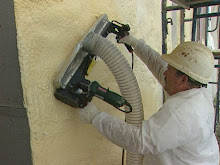
 This is the shower stall before I applied the spray foam shell and polyurea plastic liner.
 This is the same shot with the spray foam system in place. Here you can see a portion of the seat I formed with the foam.
 Here I am enjoying a rest on the seat in the shower! I formed this seat by hand out of foam!
 Spray foam is a very versatile substance. In the shower, I carved out a slot for soap, complete with a drainage notch, and built up a shelf for shampoo and such.
 This is a close up of the carved out soap slot.
 This is a close up of the shampoo shelf.
 I installed a glass door to complete the shower stall.
 This is the sink area.
"The advantages of closed-cell foam compared to open-cell foam include its strength, higher R-value, and its greater resistance to the leakage of air or water vapor." (1)
"Closed-cell foam would be a good choice where small framing sizes need the greatest R-value per inch possible." (1)For more information and to compare closed cell vs. open cell spray foam, please refer to this article on SprayFoam.com
 This is the exterior. I have opted to eliminate the rear door and window to allow for a larger shower and rear bedroom.
 This is the opposite side. Here I have opted to remove one of the windows towards the front to allow for a better living room layout and room for more custom cabinetry.
  Here I am standing with my back to the dashboard, looking down the center passage of the motor castle. To the left is my custom kitchen. The cabinet is curved for ease of movement. It also has a cutting board that slides out. There will be a sink, a stove top and a microwave. To the right is the eating nook. Down the center to the left is the space for the shower, to the right the toilet and to the back a large master bedroom.
  This is a picture of the eating area with built in benches.