Friday, December 18, 2009

Final Preparations for the Spray Foam & Stucco


I can actually see the end in sight on the stucco motor castle project. This week I applied the final metal mesh finish along the bottom edge of the motorhome which will become part of the structure as I am spraying foam and applying stucco. Once the temperatures warm up a little (we've been in the teens all week) I will begin spraying foam. Here are a few pictures of this stage of the project.
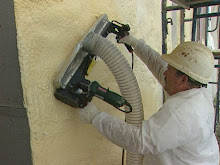
I attached a hand curved metal mesh along the bottom edge. It also has foam board dams attached to it.

Above the compartment, is a 6" x 10" block which is a sample of the wall system I intend to apply. Take a look at the sample and in your mind, replace the plywood with the metal exterior of the motorhome! Also, this compartment and all other exterior components have been built out to accomodate for the thickness of the spray foam. I actually had my buddy machine me a few mounting brackets for some of the components.

Dams are applied around all windows and structural edges.


Now if only I could get the neighbors to take down the fence!

Monday, December 14, 2009

Unearthed: Early Demolition Pictures

This week I dug deep into the vaults and unearthed pictures documenting the skeletal remains of the motor castle, pre massive remodeling overhaul.

After prying off all of the old wall covering, I was surprised to see that even in the late 70's, the motorhome was insulated with....SPRAY FOAM!


The next phase was to spray the insides with foam. I covered many of the windows and removed some. (This is my son peeking through an opening in the side). Looking towards the back.

Here is the spray foam layer, looking towards the front (my son again).

The next phase was to vac-plane the foam to be flush with the metal joists and completely flat. I used my patented Masterbond SP Vac-Plane tool.

Once that was complete I was able to attach the wood paneling I am using for my wall surface.


Wednesday, December 2, 2009

Prepping the Exterior for Spray Foam

Now that the inside is nearly finished (final paint job, laminate flooring and carpeted ceilings is all that remains for the most part), it is time to prepare the exterior of the motor home for the application of exterior spray foam and stucco.

I'm going to use my patented Masterbond SP wall system. This system of exterior spray foam is extremely energy efficient. Basically, you are wrapping the building in foam creating a seamless barrier to moisture and the elements. Masterbond SP is super adhesive and can be applied to almost any dry sound surface - wood, metal, cement, brick etc. For more detailed information on the Masterbond SP wall system and my patents, visit my website www.sprayfoamstucco.com

Here is a video detailing the Masterbond SP Exterior Spray Foam and Stucco Wall System Process:

(Also available on YouTube.com )

I've begun the preparations on the exterior of my motor home. This includes scuffing the surface to make it rougher and easier to adhere the spray foam to. This is the same principal used when applying paint or varnish to wood; it simply makes it stick better.
I've also removed and blocked off a door and window as you can see. All remaining windows and doors will be treated with dams to hold the foam back. This is going to be a very energy efficient, warm or cool motor castle!

A Throne Room Fit for the King!


Hundreds of Cabinets Hung

What would a castle be without the occasional hanging?

My brother, my carpenter friend Tim and a few of my spray foam guys helped me sand and stain all of the cabinets. We then of course hung each of them.
I am excited for all of the storage, but am also grateful to be done with the hundreds of cabinet doors. Wow!


Here are some pictures of the finished cabinets; hung!


The luxurious kitchen. There is so much storage for a tiny space, I made sure all air space was accounted for. I even made a half drawer in front of the sink!


These are the cabinets above the sink. Deep enough to hold all sorts of pots and pans but shallow enough not to interfere with one's noggin.


This is the storage along the top perimeter of the master bedroom / TV lounge.


This is one of the two large closets for hanging clothes.

Friday, November 20, 2009

The World's First Stucco Motorhome Tweets!

I've just joined Twitter! Follow me there to hear about when I update my blog and my latest progress report @Masterbondspinc

If you are involved in spray foam insulation, stucco, LEED projects etc. please send me a direct message as I am interested in following you on Twitter!

Thursday, November 19, 2009

Progress Report V: TV Lounge and Master Bedroom

Everything in the stucco motor castle is versatile. Furniture doubles as storage, rooms double in their functionality and furniture doubles as other types of furniture and can be reconfigured in various ways.

The TV Lounge and Master Bedroom are a perfect example. I've designed this room so that depending on the number of people on board, the beds can be configured in different ways. When it is just me out on a business trip promoting my Masterbond Wall System and training applicators on how to install this system, I will have the full size memory foam mattress up like a sofa on the left hand side of the room. I'm installing a TV over the twin size bed on the right side of the room.

However, if the Queen joins me on a journey, I can slide out the bed extender board, swap the location of the two mattresses and easily have a king size bed! Also, under the twin size bed is another storage cabinet; half is accessed from inside the motor castle and half is accessed from an outside door for dirty tools and spare parts. Under the sofa side of the room are going to be two large cabinets.

The sofa side of the room.

The twin bed side of the room.

The bed extension board pulled out.

As viewed from the rest of the castle.